Thursday, November 8, 2012

Pink Lace Fabric Flowers

I mentioned these pink lace fabric flowers in my last post (about the Spooky Flirty Halloween Wreath) and I really enjoyed the way they turned out, so I made some as hair clips and for dressing up your outfit on a shirt or lapel. They go pretty quickly and they are fun and very cute!

These flowers are similar in style to the ones you'll find here. I did have to modify the instructions a bit. To make these, I used a long strip of pink lace about 1 inch thick. (I found it in the remnant bins at Joanns Fabric for 50% off! Yay, deals!) I folded the fabric in half, like the instructions at the tutorial link explain, and I bunched and rolled the fabric to look like a tight spiral. This will be the center of the flower. Then I used some hot glue to secure the flower to itself so the tight spiral wouldn't come undone and I cut out a circle of pink felt about the size of the final flower (however big you choose) and glued the bud to the center of the felt circle. You'll want to coordinate your felt to whatever color lace you are using. Then continue to wrap, turn, glue; wrap, turn, glue, et cetera, et cetera, et cetera. Try not to burn yourself too much. It's hard with the lace, to be sure.

Once the flower part is done, you attach an alligator clip to the back and you're ready to rock and roll. (I also added a couple of gold fabric leaves poking out. I like it!)

Final product! So pretty and fun! I want to make a bunch of these, but I'm saving the majority of the lace to make myself a pretty pink skirt. I need to get on that.


Sincerely,

Danelle
Quite Possibly Crafts

Spooky Flirty Halloween Wreath

I made this for a friend. It's a spooky flirty wreath with stamped laminated paper and fabric flowers. This cheerful wreath makes me so excited to celebrate Halloween.


I got the wreath form at Dollar Tree. It looks like it's made of dried grape vines. I also got the spooky gray gauzy fabric to wrap all the way around the wreath from Dollar Tree.

I had the stamp on hand, "Ghouls just want to have fun." I'm pretty sure I got it in one of those clearance bins at Michaels for $1. I stamped it with silver ink on some black card stock paper, and did a poor man's laminating job with packing tape, trying not to show any seams. I wanted to make it weather-proof. I cut the excess tape off. I hot-glued this one on, but I made another wreath by wrapping brown yarn around a Styrofoam wreath form, and I wanted to be able to take stuff off and update it for other seasons, so I used pins to anchor the stuff, and then I can take it off at a whim and put something new on. Those darn yarn wreaths take FOREVER to wrap. I'm not doing that again.

Then I made the fabric flowers using pink lace and a glue gun, and some other kinds of material too. But the pink lace fabric flower is definitely my favorite! It's made in this style and is a little bit of a craft in itself. I had to do a few things to help the rolling along. Since the lace lets the hot glue through, you might be more likely to burn yourself. I also needed an "anchor" for the lace, so I used some coordinating pink felt to go under, cut in a circle about the size of the final flower. I rolled a tight circle-bunch and then glued it to itself and then glued that onto the center of the felt circle.

The ghosty ghoulies are made of that white cheese cloth you can get cheaply at the grocery store. Maybe you still have some on-hand from Halloween. Don't throw it away! Or you could used dryer sheets. I hear those things don't biodegrate, so rather than sitting in a local landfill, they could be dancing happily on your wreath and filling the air near your front door with a pleasant smell. I bunched them with my fingers 'til I got a good ghost effect and then tied them tightly round and round with white thread until I was sure they were secured. I hot-glued them on, but you can also pin them on so that you could remove them again if you wanted to.

The orange ribbon is like a harvest autumn leaves theme and it's wired ribbon that I got from, you guessed it, Dollar Tree. I'm on a very tight budget so this craft needed to be cheap. Love the craft items that the Dollar Tree has been peddling.

HAPPY HALLOWEEN!

Wednesday, November 7, 2012

Mothers Day and Fathers Day

Rewind to Mothers Day and Fathers Day 2012. I got really creative. Well, for Fathers Day, anyway. But I still got crafty for both days. I had some cute fabric I had ordered from Amazon, but when it came, it was like upholstery fabric, twill, and not like the soft cotton I had envisioned. It all worked out, I made a fancy lemonade out of lemons and my mother, MIL, and grandmother-in-law (and even me!) all ended up with really cute dishtowels. These are some of my favorite dish towels of all time. They work excellently, dry superbly, and just cheer the kitchen right up. Won't you agree? Hollywood regency updated and modernized, in punchy happy colors. Quite possibly perfect.


Maybe I'm too close to the project and not thinking clearly, but to me, they are perfection.

Okay, enough gushing about the dishtowels, I found amazing fabric (okay, Tommy Hilfiger bedsheets) at the Goodwill for the low, low price of $2 (instead of the going rate of $50!!!). I don't remember exactly how I hit upon the idea, but I remembered that my father-in-law Glenn had left his grilling gear at the last campout, and my brother-in-law Daniel was wanting to do more cooking on his sweet outdoor grill, so the common thread was telling me to sew them little roll-up grill kits made out of that fun blue-striped lobster fabric. Again, to me, perfection. I'm proud of this craft. A friend asked me if I was selling them on Etsy. I had to tell her no. I had run out of the material! Sad sad day.


This next image also fits well in the post. I think I made this for my mother-in-law for Christmas, or for her birthday, or just to say thanks for letting us live in your house and eat your food for almost a year.

It's a cute casserole carrier! Perfect for church functions and pot-lucks!


Take a peek inside!


I love it! I want one!

Cordially, Danelle

Apron Evolution

Sewing is such a learning experience. I also like to come up with my own patterns so that keeps me on my toes. I love to look at something out there and try to recreate it. It isn't always a perfect process. Still, you can tell I've come along way, Baby! I keep a sewing journal to know where I've been and to know where I'm going, and also to fix mistakes and just keep all my patterns and sewing thoughts together. It's helping me to get more organized. (And when it comes to being organized, I need ALL the help I can get!)

Apron v1.0

This was a late present for my friend Jessica. It was supposed to be a cutsie/sexy apron for a wedding present. Fast-forward a year and she's pregnant with a baby and I'm FINALLY finished sewing her apron. Also, I had my first baby in the meantime, so that's where all my time went.


The proportions are weird in the skirt part and I just wonder what I was thinking. But I still like the cute bows on the pockets and the material. I made one for myself too, so that's why I talk like it is mine! Because it is! And surprisingly it is pretty flattering as aprons go. I didn't line the back. Probably not the best for absorbing.

A recent photo of my apron in action. Canning wit the ladies. Imogene's husband called me Martha Stewart. Which I decided to take as a compliment! :-)


Apron v2.0

I made this black-and-white French toile one for my friends Amanda and Morgan. It is like one I saw on the web and recreated. I used the bias tape, which I wouldn't necessarily recommend because it makes the apron cost more. I *did* line this one. But that made it hard to sew the bias tape on, especially at the ties. Again, the fun little pockets with the bows. I'm a fan!


Apron v3.0

Rosie Riveter! I love it! I made this one like the flirty aprons I see online. Charlotte and Rebecca got these as matching aprons. :-) I made them in pairs for my awesome BYU roomies.


Apron v4.0

A gift to my mother-in-law. She's awesome! I hope she likes the little ruffle on the bottom and the little side pocket. In purple paisley! Her mother got her the fabric some time ago, it was maybe for a dress, but didn't get used. I thought it would look lovely as a festive apron so I asked her if I could use the material and sew her an apron.


Apron v5.0

I made matching aprons for me and Adeline over a year ago. Hers looks great! Mine still needs work and ruffles. I'm working on it. Okay, not really, it's on the back-burner, but one of these days I'm going to whip it out. Finish it Danelle-style, a year later!


Aprons v6.0, v7.0, etc.

6.0 is for my mom. It is also a year overdue. Very depressing. I was going to model an Anthropologie look, I have the proper materials and everything. What is my deal? Why won't I sew it? I think I'm too busy over-thinking it because I want it to be perfect for my mom. I've put down a few versions in my sewing journal and I like them, but I still haven't begun to cut them out.


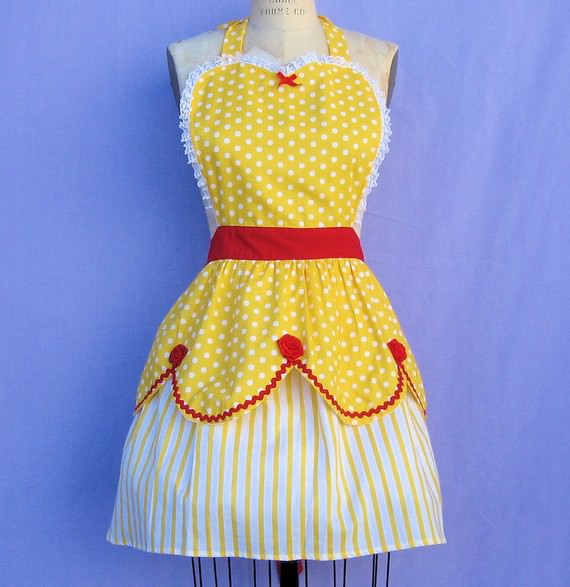
7.0 is a Belle apron, two in fact, that are mostly cut out and ready for sewing. One is definitely for me. I never wanted to be the girl obsessed with a Disney princess, after having had a fully-grown adult BYU roommate who had the ugliest collection of everything Cinderella, no joke, it took up half of our room. She was a pretty girl, too. She could have been a Cinderella look-alike but she was too busy trying to broadcast that to the world by cluttering up everything with cheesy Cinderella trinkets. I think she was engaged too, if I remember correctly, and I felt bad for her husband who had to put up with all the cheesy clutter. Hopefully he didn't break her Cinderella snow globe in the night trying to feel his way to the bathroom because there would probably be hell to pay. Thank goodness we only had to room together for the summer! But now I don't care anymore and I'm going to do my hair like Belle's occasionally and dress up in a Belle apron while I cook and vacuum. Eet's for FUN! (Maybe it will make me more likely to cook and vacuum, because it will have an element of FUN to it! Dressing up! Oh how I love to dress up!)

The other one was supposed to be for a charity auction. Oops. They ended up on the back-burner when I had to unpick the lace from the bodice of one and I couldn't find my seam-ripper so I kind of ran out of steam and now it's hard to motivate myself to start again. In other, happier news, I found my seam ripper and now I can unpick my mistakes much more quickly than trying to use clunky scissors and drive myself insane. Especially on lace. Cotton and scissors is easy! Lace? Not so much. You cut holes in your lace and curse yourself.


I hope I can update soon with final versions of v5.0, 6.0, and 7.0. That would be the BEST DAY EVER! Then maybe I'll retire from the apron-sewing business.

Cordially,

Danelle

Wedding Gift Idea - Personalized Tile Coasters

I know, the tile coasters craze has probably come and gone. But here's a great twist that really adds some personalization into the coaster idea. My friends Heather and Samir got married two years ago and they had a lovely wedding announcement with a lovely Indian-theme and graphic of a stylized peacock. Long story short, I wanted to make them coasters with that graphic and with their names and wedding date on them. Brilliant, non?

I fixed up the graphic in another program because it was touching some other information that didn't need to be on the coasters. Then I selected the paper and tried to keep some of them more manly-looking, so that if H and S had another couple over, the two men wouldn't have to feel fruity for using girly coasters. I tried to keep them matching and cute. This paper served as a frame for the wedding date info.

To get the center logo with H & S and wedding date, I out-sourced it. Since I don't have a nice printer and Office Depot is pretty cheap anyway, I printed through their online printing service. It's pretty cheap and the paper quality and printing is excellent. You don't have to worry about ink smear if you select the card stock option and their photo printing. And they usually have it ready the next day, if not in the next three hours of placing your order. And you can pay online so all you have to do is show up and get your order, easy as pie!

I carefully cut out the graphic for the center so that it had extra length so it would go under the paper "frames" I cut, without showing tile underneath. But you don't want the bottom-most paper to be too big either, and you want the crease under the frame to be unnoticeable. I think I pulled this off.

Then I mod-podged over them, let it dry and cure for a goodly amount of time, and then *VERY IMPORTANT* hit it with about five light coats of finishing spray. Finishing spray keeps the mod-podge from being sticky and tacky. You don't want to go to all the trouble of making nice looking coasters and then have the paper rip off when you are trying to pull the stack of coasters apart for their first use.

All in all, I think these turned out smashingly!


I love them.


I'm hoping to do some for me and my husband!

Cheers!

Danelle

Sunday, November 4, 2012

Baby Items Sweat Shop!

I've been working on baby items! There are four baby showers happening or ones that I have missed (or embarrassingly forgot to bring a gift to!) and I have some chenille and other fun stuff that was supposed to turn into matching bib-burp cloth-paci leash-onesie sets that I was going to sell for $20 on craigslist or to facebook friends. Trying to keep this family afloat with my free time. (Why does it smell like coffee in here? We are not coffee drinkers nor do we own any coffee. Sorry, tangent.)

These friends are finally motivating me to get working on these fun things I meant to do back in June! I'm such a slow poke! It has been fun picking up some tidbits of information from my friends - I know the colors and themes of some of the nurseries - so I get to add that personal touch and I hope that the items turn out well. Rather than just stopping at four sets, though, I hope to churn out 20-30 and sell the others. And maybe save some for more gifts so I don't have to whip together a present last minute.

The projects are still in the works, but I've cut out and ironed on almost half, just need to do some sewing and a little more cutting for the girlies. Two girls and two boys, nicely split. Congrats to the ladies and I hope I will quit spacing on these baby showers and baby gifts. I really do like attending them, and making these presents,d and I hope that you and your babies enjoy them too!

Flashback! Baby Bootie Sweat Shop! No fun! Right before baby showers and Christmas, 2011.


Still, all that hard work and back-breaking labor at the sewing machine produced something quite lovely and useful.


And these booties have a girly touch. Quite possibly.


Update! I've finished a few. I hope to do more, and learn from my mistakes. For instance, it varies but usually people like the chenille to go underneath with the cotton showing. I wonder if it's because food pieces and gunk and spit up are probably harder to get out of the chenille side, as opposed to the cotton side. But it would still have the same absorbency even with the cotton facing out. Hmm. Pondering.

For Ashley's baby boy - Hot air balloon theme. Love it! And she loves chevron. She's also particular in her tastes so I hope I got it right!


This one is for Angie's little girl. Oops, she's probably 2 months now. Maybe 3. I'm a horrible friend.


This one is more unisex, in case someone doesn't want to find out the sex of their baby. Also it is for sale if you want to buy it. I also hope to make a matching paci leash. I need to buy more paci clips.


Now time to make some matching onesies. Here's a tried and true applique I did for the neighbor girl when she had a birthday! :-)


Cordially,

Danelle

P.S. Chenille makes a mess and yes it is starting to feel like the "baby booties sweat shop" all over again. That's not the fun part.

P.P.S. Ashley got another Etsy order in for a leather-like vinyl baby bean sack for photographers and their photo shoots. She outsources the sewing to me and gives me $20! I definitely can't complain! As soon as she gets the material, I will be sewing on it. And that kind of motivates me to hurry and sew these other items first! And I'm going to put the link here as soon as I can get it from Ashley!!!

If you are a fancy rich person, you could buy one of her Etsy bean bag covers (filling not included). Maybe I will sew your order! Newborn Photography Posing Beanbag

Here is what the baby bean bag looks like.